Start with a saved route
This guide focuses on the video step. First create and save a route with at least two different confirmed stops, then tap the map screen’s “Play” button. A short three-stop route makes the choice between a whole-trip video and separate legs easy to understand. The companion route-planning guide explains searching, ordering and saving stops.
Wait for the playback scene and any required model preparation. Use “Speed”, “Size” and “Model” to review the appearance before exporting. The free model is the 747. Map scenes and animated paths are illustrative; they are not live aircraft tracking, navigation or evidence that someone visited a place.
1. Choose the video resolution
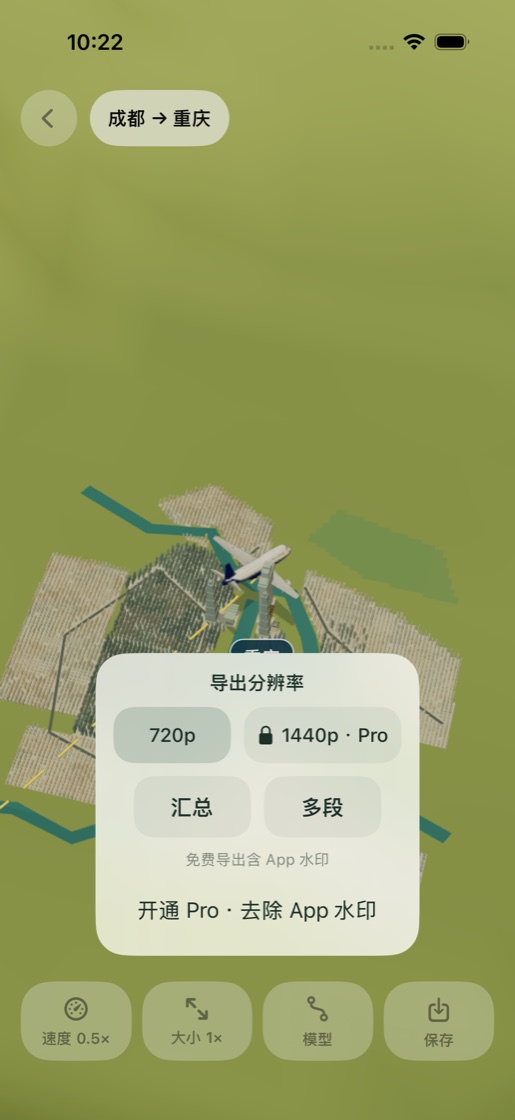
In the flight playback screen, tap “Save”. The “Export resolution” popup separates the quality selection from the type of video you want to produce.
- Choose “720p” for the free export path. Free exports include the WayEcho app watermark.
- “1440p · Pro” requires an active verified Pro entitlement. Tapping the locked choice opens membership; it does not silently grant access.
- After choosing the resolution, choose “Summary” or “Segments” to start the export.
2. Pick Summary or Segments
Choose “Summary” for one video covering the saved route. For example, a route from Beijing to Shanghai to Shenzhen becomes one continuous route summary.
Choose “Segments” for a separate takeoff-to-landing clip between each adjacent pair. The same three-stop route produces two clips: Beijing–Shanghai and Shanghai–Shenzhen. Segment clips omit the turns and camera adjustment between legs. Choose this when you want to insert each leg into a larger video edit.
The screenshots show portrait output: 720×1280 at 720p or 1440×2560 at Pro 1440p. Version 1.5.2 also supports landscape output at 1280×720 or Pro 2560×1440. App controls are excluded from the encoded video.
3. Wait for Photos saving to finish
Keep the app open while “Recording flight… Keep the app open.” and video-quality checking are in progress. Segments show clip progress for the batch. Completion of rendering is followed by an automatic attempt to save the finished video or videos to Photos.
- Allow the add-only Photos permission when the system asks. This saving path does not require reading your existing media.
- Wait for the “Saved” result. For a segment batch, success means all requested clips were saved.
- Open Photos and review the result before sharing through the iPhone’s Photos share controls.
If export or saving fails
A recording, quality-check or Photos error is not a successful save. Keep the app open and retry if recording stops. For a Photos failure, check add permission in iPhone Settings and available storage, then use “Try again” on the result popup.
An active Pro export omits the WayEcho app watermark; required map and third-party attribution remains. The purchase screen and verified subscription status determine access. Pro features require an active subscription; check the App Store purchase screen for the applicable price and terms.
Questions before you start
Does Segments export one file per stop?
It creates one clip per adjacent pair of stops. Three stops produce two leg clips.
Which version does this guide cover?
These steps cover the App Store release of WayEcho 1.5.2. Update the app to version 1.5.2 before following the guide.
Your next journey
Explore WayEcho on iPhone.
WayEcho 1.5.2 is available on the App Store. Download the app to plan a route and turn it into a flight video.
Download on the App Store